
LCD TV Calibration
How to Calibrate Your Television's Picture Settings
Reviewer: Paul Doran
Looking for Calibration Settings for your TV?
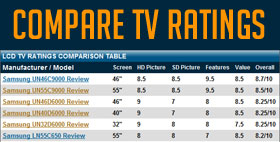
We have every TV we review professionally calibrated and we post the optimal picture settings along with the review. Check our Ratings Comparison Page or our main LCD TV Review Page to find specific TV calibration settings. If your TV is not listed then settings from a TV similar to yours from the same manufacturer will often be close if not exact.
Regular readers of LCD TV Buying Guide reviews will notice that our display reviews often contain lengthy sections detailing the various picture adjustments available on a particular LCD television. Why? Because in order to get the best detail and most accurate picture from your TV, you'll need to do some adjusting with these controls. Factory settings on TVs are almost always tweaked to maximum brightness and contrast and are enabled with image "edge enhancement" features as well. Manufacturers do this so that the TV picture will "pop" on the retail store floor compared to other models. However, this is not how the director of the programming you are viewing intended for you to see the film, or sports or sitcom that you see. It's not natural to the eye and a lot of the "enhancement" settings on a plasma or LCD TV these days are just the opposite of that. Setting the proper color, brightness, and and operating levels on an LCD TV can make a huge difference in your viewing pleasure.
WHY CALIBRATE?
If you're interested in getting the best possible picture from your flat panel or rear projection TV--or even a CRT tube TV--you can't assume that it comes straight out of the box with it's picture adjustments set properly. The next time you're in one of the "discount" home electronics stores, step back and take a look at the array of plasma, LCD, and projections TVs. Notice how they all look different? Since they're all displaying the same signal, shouldn't they all look the same?
Our Top
Recommended
Test Disc
The fact is, each manufacturer has a different idea about what "looks best," and they usually adjust their sets to show off their particular strengths--and hide their weaknesses.Also, pay attention to the lighting of the showroom itself: does your living room look like that when you watch movies, or even sports on TV? The pictures on the display floor may be "punchy" and bright, but the detail and resolution that gets washed out really takes away from your home theater experience. What's more, running a TV at these settings can even be damaging to the display technology, overloading pixel cells and projection lamps alike long before their time.
GETTING STARTED
The first step in calibrating your television lies in paying attention to your surroundings. Sit in the same spot you'd normally sit in to watch your TV. Then, make sure the lighting is at the same level you'll be using to watch movies: setting your TV to overcompensate for a brightly-lit room may give you distorted results. Watching in complete darkness may cause undue eyestrain, but a dim, diffuse light behind or to the side of your LCD TV is best. Just make sure to avoid any glare or reflection on the screen.
Next, be sure your display has "warmed up" for at least a half hour before attempting any calibration; this is to ensure that all the components of the display are at normal operating temperature and best approximate normal viewing conditions. You can take this time to familiarize yourself with the various display controls on your particular TV--get the manual out if you have to. The better you know which controls are available on your LCD TV, the better your end results will be. Though different manufacturers give different names to the controls, these are the levels you'll be adjusting:
- Black Level, normally found on the Brightness control
- White Level, usually called Contrast or Picture
- Sharpness, or sometimes Detail
- Color Saturation, usually labeled Color, or maybe Chroma
- Color Tint, also known as Hue
Beyond these basic settings, many modern TVs come packed with so-called "picture enhancements" which in reality do nothing but spoil an otherwise accurate, lifelike picture. Take a moment to dig through your TVs menus and disable any of these "features." What you're looking for is anything labeled edge enhancement or detail enhancement, flesh tone or color "correction," etc. This is a broad generalization, but basically anything not listed in the five controls above can be safely turned off. Another thing to check for is often called a "Picture Mode," or something similar: in reviews, we often find best results from a Movie or Cinema mode, which usually gives the most accurate picture with the least "enhancement." A Normal mode is a safe bet when this isn't available, but definitely avoid anything called Vivid, Dynamic, or Sports mode. Sports mode may make the grass look nice and green, but unless you're watching The Masters, it's probably not that green in real life; Sports mode is just ruining the color.
On a similar note, have a look at the options available for your LCD TV's backlight settings. Like many of the settings, the backlight is probably set to its highest brightness, which is probably too bright for comfortable extended viewing, and shortens the lifespan of your LCD TV as well. Drop this setting down at least to it's "normal" value, or even try out the Low Power or Power Saver option if it's available (in dimly lit rooms).
Finally, a word about Color Temperature. Without getting into the rather complicated science behind it all, Color Temperature basically refers to the peak wavelength of a light source, which affects the color tint given to images which should be "pure" white. Suffice it to say that while most video is produced to what's called a "6500K Standard," (6500 degrees Kelvin), not every TV comes out of the box set to display that standard properly. In fact, factory settings are very rarely are set close to 6500K.
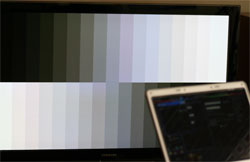
As an example, sunlight takes on a reddish tinge at sunset, when the sun's light is around 2000K, while "normal" average sunlight is 6500K. So what appears white in full sun will appear reddish at sunset. Similarly, your TV's color balance will be off if the color temperature isn't set properly. Even with professional instruments to measure the color temperature, there are few displays in any price range that can be perfectly calibrated to the 6500K standard, but your TV will have a selection that will be as close as you can get without accessing the professional service menu . The best way to tell is to use an "80% white" test image, and cycle through the Color Temperature settings on your TV until you find the achieve the most neutral gray possible. Again, names for the settings will vary, but Warm or Normal might be the best bet, with the gray tending towards reddish tones on the lower settings, and taking on a bluish or greenish cast on the High or Cool setting ("High" or "Low" refer to the color's wavelength, not the Color Temp.). If your TV happens to have a 6500K or 6500 setting, use that.
CALIBRATION TOOLS
Calibrating by sight alone might give you an improved picture from the factory settings, but to get the most detail and accuracy out of your LCD TV calibration, you're going to need a set of video test patterns. A cheap, easy fix is to use the THX Optimizer included on many DVD releases: just look for a DVD in your collection with the "THX Certified" logo. The THX Optimizer provides a usable set of patterns that will give recent results, but for a more thorough and accurate calibration, a dedicated Home Theater setup disc offers more fine-tuning options and the added benefit of step-by-step instructions that walk you through the entire process. Joe Kane's Digital Video Essentials disc and the AVIA Guide to Home Theater, published by Ovation Multimedia, are both highly-rated and effective choices. To get closer to D6500K than this, you will need to hire an ISF calibration specialist or use the settings in our reviews (if we've done one on your TV).
No matter which calibration disc you choose, the test patterns and adjustment process will be similar, following the five steps outlined above:
BLACK LEVEL
How to Optimize your TV Picture Settings
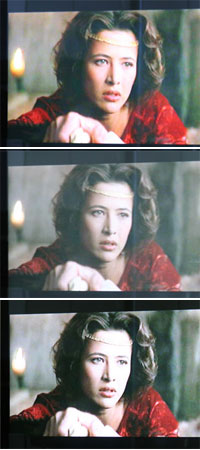
See our picture setting comparisons with this shot from Braveheart.
LCD and plasma TV manufacturers are proud of announcing their latest improvements in Contrast Ratio, and rightly so: the contrast of a display--that is, the difference between the "blackest" blacks and the "whitest" whites--is one of the most important factors in achieving a realistic picture that accurately conveys all the information present in a video signal. Half of that equation, the Black Level, will be calibrated using the Brightness control on your TV.
Black Level is optimized using a PLUGE pattern ('PLUGE' stands for Picture Line Up Generation Equipment), which regardless of your calibration disc will consist of a black-and-white screen divided into various shades of grays, running all the way down to black. A crucial step here is to make sure your DVD player itself is configured properly; the PLUGE pattern actually contains some areas which are below black, and you should make sure your DVD player is set up to send "below black" signals by enabling the option in the setup menu of your DVD player. Again, consult your manual if you can't find the setting: you're looking for "send below-black signals," "0 IRE Signals," or something similar.
The PLUGE test and Brightness calibration will basically take the form of lowering the TV's Brightness control until a black area of the screen (leftmost and rightmost black bars on Digital Video Essentials, dropshadow of the THX logo on the THX Optimizer) disappears from view, then slowly raising the Brightness until it is just visible. This adjustment assures that anything intended to be black on your DVD will be completely black, while still allowing you to see every detail in dark or shadowy scenes.
WHITE LEVEL
Closely related to the Black Level, but at the other end of the spectrum, is the White Level. Again, it's common for TVs to come out of the box with the Contrast or Picture control set far too high, which results in whites and bright shades "blooming," or bleeding together: think of the brightest shades in a scene looking as if they were "colored outside the lines." To adjust the White Level of your LCD TV, you will use a test pattern that features a pure white area contrasted with a 95% or near white area. The setup will differ according to which calibration disc you use, but the basic idea is the same. There are two things you're looking for in this adjustment: 1) You want to be able to distinguish the slightly darker box from the pure white box. This will ensure that you get all the fine details in a bright scene--like faint shadows or texture in snow, or the creases in an actor's white shirt. 2) You also want to ensure that the whites aren't set so high that the whites "bloom" into surrounding areas; this will greatly reduce the contrast and sharpness of your picture as colors bleed into one another.
To make the adjustment, first raise the Contrast control (sometimes called Picture) until the darker white area disappears into the pure white. Then, gradually decrease the Contrast until the box is visible again. One click may make the difference, so take your time and make careful adjustments. Finally, once you have the White Level where you want it, closely examine the edges of the pure white area where it borders the black background. Is it a sharp line, or does the white area blur or smear into the black? If it's a sharp line, you're in business. If the white area "blooms" into the black, back off the Contrast a notch or two until the border is sharply-defined.
Because the Brightness and Contrast settings are so closely related, you may find in some cases that setting the proper White Level disturbs your setting of the Black Level (Brightness control). After setting the Contrast or Picture properly, go back and have another look at the PLUGE pattern and double-check the Black Level setting. If you're very picky, or your TV lacks fine adjustments in the Brightness and Contrast controls, you may have to go back and forth a couple of times to be sure everything's in order.
SHARPNESS
Sharpness is perhaps the most difficult element of TV calibration to explain, in part because it has more to do with how our eyes perceive an image than with anything that can be physically measured. For starters, it may help to understand what the Sharpness control can and cannot do. It cannot actually increase or decrease the physical resolution of your television: the resolution depends on the actual number of pixels available in the panel's construction. What it can do, though, is make transitions between colors and shades appear sharper to the eye. You might initially think "the sharper the better," and set the Sharpness to it's maximum. The problem is, however, that as your TV increases the visible sharpness of an image, it also introduces unwanted artifacts that detract from accuracy, and even cause eyestrain during prolonged viewing.
The THX Optimizer does not include a Sharpness test pattern, but the DVE and AVIA discs include similar ones: a gray background featuring a black circle with lines radiating out towards the edges of the screen. This pattern is designed to give the sharpness of your TV an optimal test, but even without a test pattern you can see the effects of the Sharpness control: when the Sharpness setting exceeds the optimal level, you will see the artifacts of excessive sharpness around any edge between black and white, or between different colors on the screen. This usually appears as a either a dark "ghost" images of the edge, or a bright "halo" around objects in the picture. These artifacts, not present in the DVD signal, serve to highlight the edges and make appear more defined to the eye.
What you're looking for as you adjust the Sharpness is to get the sharpest possible lines and text in the test pattern image, without the appearance of these false edges and the "halo" effect. Start by cranking up the Sharpness control until the halo artifacts are evident, then back down slowly to the point where they just disappear. At first glance, the picture may appear to the eye to be overly "soft," or slightly blurry. But once your eyes get used to the Sharpness level, you'll actually begin to see more detail, especially in moving images, because the edge effects won't be distracting you from the intended image.
As with any setting, of course the final choice is up to you: some TVs, even good ones, have a naturally soft picture and you may find you actually like a little "extra" sharpening to get the most enjoyable effect. If nothing else, calibrating the Sharpness by this method will give a good baseline to start from.
COLOR SATURATION AND TINT
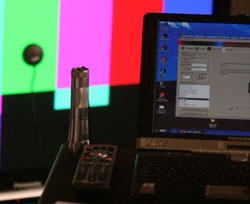 The Color adjustments are where having the proper calibration equipment can make all the difference in the world. Both the AVIA Guide to Home Theater and the Digital Video Essentials discs come packaged with blue, red, and green plastic films that accompany this part of the calibration. THX offers a set of blue filter glasses, which you can order through the THX website. The THX Optimizer combines Color and Tint on the same test, and the more sophisticated discs offer a couple of choices for color and tint tests.
Some of the language about Color adjustment, sometimes called Color Saturation, can be a bit hard to follow, but it all boils down to this: there is a level on your TV where the monitor is displaying precisely the color information sent to it by the DVD player, no more no less. That's the level you're looking for. Your TV probably comes out of the box set to artificially boost the color levels, which makes for a dramatic appearance on the sales floor, but ultimately is a distorted version of what the movie director intends you to see. Again, make doubly sure that your TV is in the most neutral color "mode" before undertaking this potion of the calibration: Vivid, Sports, or other modes are designed to artificially boost color saturation in different spectra, and may throw off your calibration considerably.
To set the Color or Saturation level, you'll hold the blue-tinted filter in front of your eyes and adjust the Color control on your TV until the appropriate boxes match. Test patterns vary among calibration discs, so make sure you understand the directions for your particular system. Once you have the color saturation set to the most accurate level, you can move on to the Tint.
Color Tint, labeled Hue on some TVs, basically controls the balance of Red, Green, and Blue in your TV's picture. Following the instructions on your test disc, adjust the Tint control appropriately. Also, be aware that, just like the Brightness and Contrast controls, Color and Tint are to some degree dependent upon each other. After setting the Tint appropriately, you may want to go back and check the Color level just to be sure. Once you're satisfied, you're ready for one final step in color calibration: do you like what you see?
Just like Sharpness, color levels are to some extent largely a matter of taste. Before you call your TV calibration complete, use the scenes provided on your test disc, or a favorite DVD, to double-check your color and hue settings. Of course you'll want to use a scene where you know beforehand what the colors should look like! Find a standard color you know, like a US Flag or your favorite sports team's uniform, and fine-tune the Color and Tint settings until it looks "right" to your eye. The ultimate test for color saturation and tint is flesh tones. Complexions vary widely of course, but if everyone looks badly sunburned, or more Martian than human, back off the Color control and/or tweak the Tint accordingly.
WHAT YOU SEE IS WHAT YOU GET
You might say the main consideration in TV calibration is found in the Black Level and White Level adjustments: setting these properly will make sure you get everything you paid for out of the contrast of your TV, while possibly improving its lifespan by not overdriving it's pixels or lamps. In terms of pure accuracy, adjusting the color levels and sharpness as recommended will make sure that what you see on your screen is what the move director intended you to see. Of course, surrounding room light conditions will determine a lot about how the LCD looks, and when all is said and done, it's your TV, and you can watch it how you like it. Think the picture's too "soft"? Bump up the Sharpness a bit. Not enough detail in dark scenes, Turn up the Brightness. And if you want green, green grass--even at Lambeau Field in mid November--then by all means, crank up that Sports mode and go crazy with the Color control--just don't be shocked when your friends ask "What's wrong with your TV?"
Calibration Settings for your TV
The Televisions we review are calibrated with professional equipment, a service like this can cost hundreds of dollars. Even if we did not review your exact TV and different size in the same model line or even settings from another TV from the same manufacturer can be a good starting point for your own television. Click here to see a listing of all our reviews or here for a review comparison chart.
Some of our latest professional calibrations
Below are some of the most recent calibrations from reviews we have done. If you have the same model of TV but a different size then the calibration should work or be very close. For more calibrations see our reviews page.
- Sony KDL46EX720 Calibration
- Samsung UN46D6000 Calibration
- Toshiba 46SL417U Calibration
- LG 55LV5500 Calibration
- Samsung UN55C7000 Calibration
- Panasonic TC-P50GT30 Calibration
- Samsung UN55D8000 Calibration
- Panasonic TC-P50ST30 Calibration